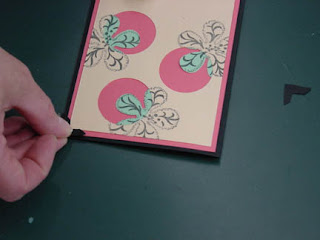
You'll need the following paper -- a 5 1/2" x 8 1/2" piece of black cardstock, a piece of 5 1/4" x 4" textweight in both white and cherry, a piece of 8 1/2" x 2 1/2" green textweight, and a piece of 5" x 3 3/4" peach bristol cardstock.
And the following supplies -- purple Daisy Design flower stamp, EK Success paper shaper matching flower punch, 1 1/2" Marvy Clever Lever circle punch (the yellow one), a black ink pad, four photo corners, an X-acto knife or a pair of scissors, and a glue stick.

First, stamp the flower three times on the peach cardstock (it's OK if the image goes off the edge of the cardstock).

Then use the circle punch to punch three holes in the peach cardstock, cutting off part of the stamped flower each time.

Stamp the flower three times on the green text paper (don't go off the sides this time).

Carefully punch out each stamped flower with the flower punch.

Match up the green punched flowers behind the peach stamped circles so the green shows through the holes. Glue them in place and trim off whatever sticks out from the edges of the cardstock.

Layer the cherry paper and the peach bristol on top of the folded piece of black cardstock.

Then add the four corners.

Paste the white text inside the card to give you something to write on, and you're all done!
So how did I do? Too much info? Not enough?
One more thing -- I got a major kick out of Leslie, as she did the whole Make It/Take It barefoot. She was quite proud of her pedicure -- I was more intrigued by the amount of dirt she was accumulating from the floor. So I took a picture of both . . .

If all goes well, I might try this again with Saturday's Make It/Take It. New project -- same feet . . .


OMG Gregg, LMAOPIMP! You did a FAB job! Awesome buddy! You pass, lesson is perfect, but feet are the best! I'm lookin for the next one! hugz....
ReplyDeleteGreat job Gregg! I was able to follow the directions and do one similar at home.
ReplyDeleteKeep it up!
Hey Les, It's great to see your smiling face and dirty feet! Whoops, did I say that
ReplyDeleteHey guys, great to see you on here Leslie. I loved your dirty feet and of course I love the socks. Hey how about making it possible to print the directions off for those of us that can't make it to Centerville...Florida is just too far away. But I'll see all of you in May.
ReplyDeleteI love the punch was it a 4 peptal flower? Thank you Mary Redford ..
ReplyDeleteMredford24@aol.com
Great idea! I will be using it for a card swap I am invovled in...thanks for such great directions!
ReplyDelete