Wednesday, July 29, 2009

The Busiest Week of the Year at Marco's Paper

The title is a little misleading -- it's actually the busiest ten days of the year for us. When we're on the road, customers often mention that they'd like to come visit our store someday. This is the week I always recommend.

For Karen and me, the "week" starts Friday while we're setting up for the Novi Rubber Stamp & Paper Arts Festival in Novi, Michigan. It's at the Rock Financial Showplace on Grand River, about 25 miles northwest of downtown Detroit. This is one of the biggest shows of the year -- the show starts at 10:00 on Saturday morning, and there were years when it was at the nearby Expo Center that the line has started forming at 7:30 (and that was outside in the hot sun). At "The Rock" (that's their nickname -- not mine), the line is inside the building, but it still snakes most of the way around the building when I go out to pass out flyers before the show starts. This weekend, we're going to do the same layout we did in Massachusetts in June -- a 50-foot booth, with Susan Pickering Rothamel from USArtQuest on one end and Tim Hammonds from Scor-It on the other. In-between, Sue Nelson from Heartprints.net will be demoing Cuttlebug, Sizzix, and Spellbinders embossing dies and Copic Markers. And for the first time, we'll also have the new electric Big Shot Express from Sizzix! It retails for $169.99, but we'll have it on sale at the show for $135.99 (no other discounts available).


It never ceases to amaze me how many customers in Novi will pass through my checkout line and end our conversation with "See you next week!" As soon as the Novi show ends on Sunday, we shift into high gear all week for the Summer Stamping Gala at our retail store in Dayton, leading up to Stampaway USA XVII at the Sharonville Convention Center in Cincinnati on Saturday, August 8 (and Friday evening August 7 if you bought a ticket for the Preview Party in advance so you can come and see our goofy costumes).

You have to see our store during a convention week to believe it -- IT ROCKS! We have classes, free demos, make it & take its and more scheduled all week long. Since Detroit and Cincinnati are so close, many of the vendors stay in the area all week. So we always schedule several to make appearances in the store -- this year, we have Susan Pickering Rothamel from USArtQuest, Mitra Friant from Impression Obsession, Sarah Justison from The Paper Cut, and Polly Weed from Polly's Pals on the schedule. Others seem to drop by unannounced as the week goes on . . .


. . . even Zoe will be on hand a few times to greet her adoring public!

There will be extended hours at the store all week -- if you're in our area, you'll want to come by every day. If you get worn out, Walter has a cot in the back that he uses for naps (if you were 95, you would too!).

Want to see more? You can look at a list of all of the events for the week at http://www.marcopaper.com/summerstampinggala.pdf or see it in calendar form at http://www.marcopaper.com/classes.htm

Then get on the phone and call the store at 937-433-7030 to reserve your space -- just about everything requires advance signups (even the free stuff), and spaces are filling fast!

Stop by -- have fun -- take pictures (and then send them to me -- I'll put the best ones on the blog along with mine next week).

Thursday, July 23, 2009

Sights from the Road and a Surprise Back at Work . . .

One of the joys of driving to shows is the sights you see along the way. I don't even mind reading the billboards along the interstates -- some of them are entertaining and help keep me alert. But heading to Texas last week, I saw something I've never seen before . . .


I'm sure you get lots of those silly e-mails with outlandish pictures that are obviously Photoshopped. I know this one is real because I took it last Thursday on I-40 between Nashville and Memphis. A flatbed tow truck passed me with a car on board -- and the car had a huge nail driven through the hood. No doubt it's a gag of some sort, but it was quite a sight. It was 100 yards past me before I remembered that my cell phone takes pictures, so I had to crop the shot I took quite a bit to get this.

Addendum: Thanks to Katie Heyer, who sent me an e-mail this afternoon to explain what I saw. This is part of a campaign by the Tennessee Governor's Highway Safety Office to combat drunk driving. I found a related article in last Saturday's Memphis Commercial Appeal (http://www.commercialappeal.com/news/2009/jul/18/police-hope-to-nail-violators/), and if you click on that link you'll see "my" car in the photo! And I found a video with the commercial, too -- http://adland.tv/commercials/tennessee-governors-highway-safety-office-nailed-2009-30-usa


Coming home, I drove through a quick rainstorm on the way through Cincinnati. Then the sun came out and for the first time I can remember I got to see both ends of a little rainbow (of course, looking at a cell phone to take pictures while driving is stupid, so I just pointed it in the direction of the rainbow without looking and took a shot, and missed one of the ends).


And the obligatory shot of Zoe after I picked her up from the kennel . . .

I got back to work on Tuesday, and as I headed to the side door to get something out of the truck I got a shock . . .


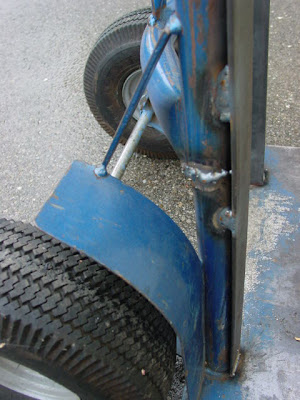
MY TWO WHEELER IS BACK! My faithful friend has returned -- I have been without it since late May when it broke (see "Occupational Hazard" in the May archives). My mechanic across the street said it could be repaired, but he needed some fresh welding supplies. I have been working with a replacement I got at Home Depot, but it's not the same.


We all have scars from our injuries, and my two-wheeler is no different. My mechanic even welded a couple of braces to give it more strength when it goes back into service next weekend (August 1-2) at the Rock Financial Showplace in Novi, Michigan.

Sunday, July 19, 2009

The Slightest Bit of Envy for a Nine-Year-Old Boy

After the show ended yesterday, I jumped in the truck and headed from Grapevine to Rangers Ballpark in Arlington (about 20 minutes south). Finding a place to park the truck is sometimes an adventure, but not here -- I have been here twice before and know a good parking lot a couple of blocks from the stadium.

Things have changed a lot since the last time I was here . . .


The Dallas Cowboys built a new stadium just across the parking lot. I took both of these pictures from the same spot with my cell phone -- just took the picture of the new stadium and then turned around and faced the entrance to the ballpark.


I love ballparks. There is still a bit of that "little boy" wonder in me when I walk out where I can see the panoramic view of the field for the first time.

But nothing like this . . .


The nine-year-old boy in the background (that's his sister in the foreground) was attending his first major league game. In the sixth inning, a guy in the next section caught a foul ball -- it was a nice catch -- and gave the ball to this boy. Then during the seventh inning stretch, the kid ended up on the JumboTron. Thankfully, his dad had a camera handy. I leaned back afterward and asked Dad how he was going to explain to his son that not all games are like this!

Saturday, July 18, 2009

Happy Birthday, Walter!

If you have ever been in our store, you may have seen Gary's father-in-law, Walter. He spends most of his day in the back, working on packaging and assembling paper packs and such and helping with the behind the scenes stuff. He is almost always there -- 40 to 50 hours a week with more energy than all of us.

Today is Walter's birthday -- he is ninety-five years old.


We had a party for him on Tuesday in our classroom before some of us left for the Texas show this weekend. And that means food . . .


. . . and cake! We did this five years ago on his 90th birthday, and I made a point of taking a picture of Walter with his children, Jim and Peggy.


So I did it again on Tuesday. Then we strong-armed Gary and Jim's wife Mary Jo to join the picture. Happy Birthday, Walter!

The Search for Summer Continues

I am now in Grapevine, Texas (near the Dallas-Fort Worth airport). Picked a good weekend to head south in search of "hungry" stampers and warm weather -- it's only supposed to be about 70 degrees at home today. It was 106 as I rolled through northeastern Texas on Thursday afternoon. A little cooler Friday (only 98), but we started setup at 8:30 in the morning so we could get the truck unloaded before it got too hot.

The early start and a great group of experienced local helpers who know where everything goes (thanks to Jane, Ann, Natalie, Suzanne and Barbara) that meant we got done by mid-afternoon. Also meant that I had time to go to a local golf course and play 18 holes. There will be those who think I'm crazy, but the thought of walking around lugging my bag on a July afternoon in Texas sounded wonderful.

And it was. There was no one ready to play when I got there, so I played by myself and got around in a little over three hours. I'll admit I was tired when I finished, but I played pretty well for me and just took some time to enjoy myself.

I don't often get a chance to do more than one "me" thing when I'm out of town (and sometimes not even that), but I may get a double dose this weekend -- if all goes well, I hope to make a trip out to Rangers Ballpark in Arlington and catch a baseball game tonight.

Monday, July 13, 2009

A "Banner" Day at Marco's Paper

I wandered up to the store at lunchtime today to take pictures of the projects for this week's Wednesday and Saturday Make It/Take Its. The locals like to see them in advance -- if you're not local but would like to see them anyway, they can always be found at http://www.marcopaper.com/wednesdaymiti.pdf


Amazing what changes between Saturday and Monday. I took pictures of the new sign Saturday, but now a new banner has appeared.

I guess it's a good time to make a shameless plug for the Summer Stamping Gala in our store from August 3 - 9. If you're coming in for Stampaway USA in Cincinnati on August 7 & 8, let me encourage you to include a stop or two at our store in your travel plans. We plan a full week of activities, specials, classes, demos, make it/take its, and more leading up to the show (we used to just call it "Stampaway Week" until we found out that "Stampaway" is copyrighted -- so this year Karen and Joanne came up with a new name!).

We always have a few of the national names in the store -- since there's only a week between the Novi (Detroit) show and Cincinnati, several of them spend the week around here and we're more than happy to give them something to do to pass the time! This year, we'll have Polly Weed from Polly's Pals, Sarah Justison from The Paper Cut, Mitra Friant from Impression Obsession, Susan Pickering Rothamel from USArtQuest, and Beverly Anderson from Dreamweaver, along with two talented ladies we've "discovered" on our travels -- Andrea Cloutier from Florida and Peggy Gould from North Carolina.

And that's in addition to our "local favorites" -- Donna Weibel, Libby Friel, Linda Jones, Ginger Deaton, Connie Vogt, Pat Adams, Dawn Cutter, Lisa Budenz, Donna Sheetz, and if I missed anyone else, I'm sorry!

Intrigued? Then you need to see the list of events for the week -- and you'll find it at http://www.marcopaper.com/summerstampinggala.pdf If you'd rather see something in calendar form, go to http://www.marcopaper.com/classesfuture.htm

Just about everything requires advance registration (even if it's free), so when you see something you want to attend, please pick up the phone and call the store at 937-433-7030 (or call 1-888-433-5239 between 8:30 and 4:30 EDT and we can transfer you there). Space is filling up quickly, so don't delay!

I hesitate to mention this, but if you need a little more incentive to make the trip from long distances, you need to take a look at our costumes from the past few years of Friday night Stampaway Preview Parties. This year's theme is "Wear Your Art Out", so who knows what we'll come up with (the vendors and customers are encouraged to dress to the theme). If you dare, go to http://www.marcopaper.com/convention.htm and scroll down the page past the convention schedule and booth pictures. Remember, I warned you . . .

Saturday, July 11, 2009

New Project & New Picture

Connie Vogt was in charge of the Make It and Take It in our store on Wednesday. As I have said before, Connie is very thorough -- I got step-by-step photos and detailed instructions almost a week in advance.


This is where we're headed -- seems very fitting for summer grilling season, doesn't it?


And here's what you'll need to get there . . .

Cardstock:

5½” x 8½” cardstock – Kaleidapaper – Black
4” x 5¼” cardstock – Cougar opague – white (80#)
(10) ½” strips of Carnival cover cardstock (80#) – red
(7) ½” strips of Cougar opaque cardstock (80#) – white
2-1/4” x 2-7/8” cardstock – Cougar opaque – white (80#)
3-1/8” x 2-1/2” black glossy cardstock

Stamps used:

Stampendous – Changito Chef (CRV154)

Other supplies used:

- Memento dye ink pad – tuxedo black
- Spellbinders large deckled rectangles (S4-202)
- Spellbinders classic rectangles small (S4-130)
- 5/8” ribbon – (1) piece 20” long and (1) piece 3” long
- 1/8” hole punch
- Corner rounder punch
- 3/16” glue dots
- Markers or colored pencils


Stamp image on white cardstock rectangle; color as desired and cut out using Spellbinders die. Cut deckled edge rectangle from black glossy cardstock using Spellbinders die. Mat behind stamped image.


Lay out red strips on a flat surface so that their long sides are touching each other. Place a strip of tape across the top edge. Using the white strips, weave in an even pattern, keeping the strips nice and tight. Tape across all edges to hold in place. Trim to approximately 5-1/4” x 4” and adhere loose ends on front side with small glue dots.


Fold ¼” under on short edge of black cardstock. Adhere to other end, forming a tube. Flatten and crease opposite side. Round corners of white cardstock. Insert white cardstock into black card, aligning edges on right end. Punch 1/8” hole through all layers.


Remove white panel and turn around so that the 1/8” hole is on the left side. Align holes and thread ribbon through all layers. Stamp or write desired message on white panel.


Push panel into card, leaving approximately 1/8” extending beyond card edge. Tie ribbon in a bow and trim off excess. Tape short piece of ribbon under left edge of stamped image. Adhere stamped image to card front on right side with foam tape. Wrap other end around left front opening of card front and tape in place. All done!

One last item -- Connie wanted me to take a new picture of her. I have to admit that I ambushed her a little the last time -- shot it from long distance when she wasn't watching. So I tried to do better . . .


. . . and focused on the background instead. I'll try again next time. I owe her that much -- she gave me a recipe for snickerdoodle cupcakes last week that I'm planning to try tonight . . .

Camera Shy . . .

Linda Jones is one of the newer teachers in our store. The irony is that Linda does not live near Dayton -- she lives more than 200 miles away in Michigan. But she comes this way often -- as I understand it, she has one or more grandchildren near Columbus that need to be spoiled rotten regularly.


Linda specializes in "vintage" cards and has developed quite a following here. She was holding a class when I wandered into the store on Thursday, but she doesn't use our classroom -- she likes to set up in the prep area in the back.


So I climbed up on a box and tried to shoot a picture of the class. But Linda seems shy -- she wasn't too thrilled about facing the camera. Fortunately, the nice lady in the red blouse is not shy, and was quite pleased to point her out.


Then while I was zooming in, she pulled out the hook (her cane) and finally got Linda to turn my way.

* * * * * * * * * * * * * * * * * * * * * * * * * * * * * * * * * * * * * * * * * * * * * * * * * * * * * * * *

I had really come by to shoot a picture of the new sign outside. The old one had become cracked and more than a little weatherbeaten over the years.


So out with the old (though this picture was taken when we first moved into this location) . . .


And in with the new. The type is easier to read from the street, and we really like the ladybug!

Tuesday, July 7, 2009

Your Mouth Can Start Watering Now . . .

It is finally time. If you like chocolate, you might as well call your local undertaker in advance, because these cookies are simply deadly. I got this recipe a couple of years ago from my then-13-year-old nephew, who loves to bake and would like to eventually become a pastry chef. I made my most recent batch over the weekend for a family reunion, and took pictures as I went along. If you want to skip the pictures and get straight to work, the entire recipe sans photos is at the end of this post.

Without further delay, here is the long-awaited recipe for Chocolate Mint Cookies . . .


It is almost brutal to show you the end product before telling you how to make them, but this is where we're headed.


This recipe is simple -- there are probably only two ingredients you'll need to get that aren't normally in your pantry. You'll need a bag of Ghirardelli Semi-Sweet Chocolate Chips (not milk chocolate or cacao) and a box of Andes Mints. You might want to get two of each while you're at it -- these cookies freeze wonderfully, and in warm weather I actually prefer them that way.

Note: I am making a double batch in the pictures that follow, even though the instructions are for a single.


Take 1 pkg. (11.5 oz.) of Ghirardelli Semi-Sweet Chocolate Chips and ¾ cup butter or margarine (1½ sticks) and melt them together in the microwave (warning -- cover the bowl to avoid extra cleanup, since butter/margarine "pops" when it's heated).


When it comes out of the microwave, it looks really gross. Relax -- it gets better.


Scrape the melted chocolate chips and butter into a mixing bowl, and stir in 1½ cups brown sugar, 2 eggs (I use Egg Beaters since I have high cholesterol), and 2 tablespoons water. Blend well.


Then mix in 1¼ teaspoons baking soda, ½ teaspoon salt, and 2½ cups all-purpose flour.


When everything is mixed together, the batter will be pretty thick -- my trusty wooden spoon will just about stand up when left unattended. It was just starting to fall over as I shot this picture . . .


Then refrigerate the batter for at least two hours. You can refrigerate it much longer -- for this batch, I mixed the ingredients in the evening on Saturday (the 4th of July), and baked two cookie sheets worth after the fireworks. I didn't bake the rest until Monday evening.


When the batter comes out of the refrigerator, it will be hard as a brick, and you'll need good muscles and a sharp spoon to get it out.


Place walnut sized chunks of dough on a cookie sheet (I use the ones with air pockets underneath) and bake at 350 degrees for 12 minutes.


Oh, here they come. Can't you just taste them? Sorry, not yet -- they're still really mushy. Set up a large space with some wax paper over a big towel so the cookies can cool. To get them off the cookie sheet, you'll need a spatula with a pretty sharp edge and a quick swipe of your wrist to get under each cookie. Otherwise, they'll just fall apart -- and it WILL happen to some, no matter how good you are. Just set the rejects in a corner of the wax paper and eat them piece by piece later . . .


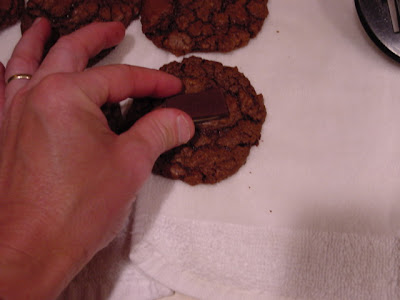
Place an Andes Mint on top of each cookie. You may want to skip a few if you have un-American people like my son in your household. Ryan likes them better without the Andes Mints.


After 7-10 minutes, it will look like the Andes Mint hasn't melted yet (you may even still be able to read "Andes" on top). The first time I made these, I was sure I had messed something up. Just touch it with a knife and spread it over the middle of the cookie.


Here's the finished product again. This is the hardest part -- you need to let them cool before you serve them. These cookies are really good (but messy) when they're hot, great when they're warm, and incredible when they have cooled and the mint has hardened. I like to eat all the way around the edges and then tackle the middle. And do try them frozen, especially on a hot day . . .

Now I'll print the entire recipe without pictures so you can cut and paste it and print it out for yourself. Let me know what you think of them after you've made them . . .


Chocolate Mint Cookies

¾ cup butter or margarine (1½ sticks)
1 (11.5 oz.) pkg. Ghirardelli Semi-Sweet Chocolate Chips (not milk chocolate or cacao)

1½ cups brown sugar
2 tablespoons water
2 eggs
2½ cups all-purpose flour
1¼ teaspoons baking soda
½ teaspoon salt
1 box Andes Mints

Melt butter or margarine in microwave along with chocolate chips. Stir in brown sugar, eggs and water. Blend well. Mix in dry ingredients. Refrigerate at least two hours (can be refrigerated much longer).

Place walnut sized chunks of cookie dough on cookie sheet. Bake at 350 degrees for 12 minutes. Remove from pan and add an Andes Mint to each cookie. When melted, spread with a knife. Let cool before serving. Baked cookies can be frozen.